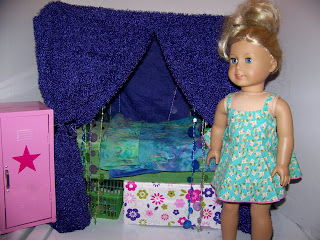
Here is the doll bed we made today. Believe it or not it is made from all recycled materials.
We started out with a cereal box, an old telephone book and some packing tape.
Start out by taping one end of the box. We left the flaps open and taped it so that the tape was our end of the box to hold the crumpled up paper in.
We stacked the boxes so that the the bed would have some extra support. This bottom box will work as a drawer for storing the doll clothes in.
We used some old plastic tent poles from a toy tent that broke. (You never know when broken pieces might come in handy for a project.) We used a lot of packing tape to hold things in place.
We used glue sticks to help hold down the scrap paper to cover the images on the cereal box. Then we covered it with white school glue to add our tissue paper on the surface. This will give the bed a fun look when it doesn't have the handmade sheet on it. This will also help it to wear better with all of the use it is going to get. Here we are using a glue stick to cover the bottom support drawer with tissue paper. Helps to save this from those pretty presents you get. The crumples don't matter now do they?
We used hot glue to hold the poles together and then tied them off with ribbon for extra support.
We used a piece of scrap fabric to make a special sheet for the bed. We sewed the hems and used fray check on the edges that will be by the poles.
It's coming along nicely. Here are the beads we used to jazz it up. We used hot glue to attach the beads to another bead around the pole so that they can slide along the pole.
Here are the cut pieces of material for the canopy. These used to be a curtain.
Since I am trying to show that this can be made out of things we already have. I improvised and made do with the scrap batting I had to make it work for the doll quilt. I zigzag stitched the pieces together so it would be large enough. (Normally, I would not do this but since it is a small size, this will work.)
Here is the quilt sandwich with right sides pinned together. We are ready to sew up the the quilt leaving one short end open. Oh, I did pin the batting on to the wrong side of the quilt (from the right side) so that when the quilt is turned, it will be laying inside nicely.
Clipping the corner so that the corners will turn nicely. Yes, I mark my scissors so they don't get picked up by hands that don't know these are not to be used on paper! The quilt has been turned and pinned and now the open end is being stitched shut with a topstitch. I topstitched the rest of the quilt.
Here is the finished doll quilt. I did a free form stitch between the decorative embroidery to add hold the batting in place. I added some embellishments on the bottom to help hold the batting. I had some cute little flower buttons and a little button that says princess.
Here is the finish product with a happy little girl. I think it turned out pretty nice. Hard to believe it is made out of a cereal box.
Saturday, September 19, 2009
Make Your Own Doll Bed
Posted by 3Tabors at 7:15 PM
Labels: American Girl Doll bed, cereal box craft, crafting, make your own doll bed, recycle, tutorial
Subscribe to:
Post Comments (Atom)


0 comments:
Post a Comment